Showing posts with label Game guides. Show all posts

Tuesday, 2 December 2014

Game of Thrones Ascent: Reincarnation

Hello again,

So, I've finally finished collecting all the screen shots that I needed to take you through the process of reincarnation. I realize that not many people are aware of the full process or what it means and I hope to elevate some of your queries.

First of all, I have done this enough to know pretty much the inside and outside of this, however, I do know that my knowledge might be limited so you'll have to bare with me. I'm a wizard still trying to figure out these muggle things after all.

Alright, what is reincarnation? Reincarnation is the process in which your character literally starts over, from the beginning. You'll go through all the training quests that teaches you how to upgrade buildings, buy swords, the basic stuff that you did, the very first time you started playing.

That's right, you basically start off as a new player with a few extra stuff.

1) Your amount of power that you've accumulated so far, will not be reset. It will continue from where you left off, so that's a good thing.

2) Gold that you've purchased or have gotten free from playing the game 7 straight days in a row, will not disappear. They will stay with your account.

3) Permanent items/sworn swords. They are as described, they will be permanently available to your new character but you can only use them after you've passed level 4. So don't panic if you don't see them.

4) Speed-ups. These are your food items, that help speed things up. Those that are tagged "Persists through reincarnation" means that it will stay with you and would not be reset after you've reincarnated.

5) Gold upgrades will stay unlocked as well. You do however need to spend the silver or achieve the requirements to unlock it again but you will not need to spend more gold on it.

Some of you might ask, "What is the point of reincarnating if we do not get anything new from it and we have to start over?".

Well, you do not have to reincarnate. It is a choice some players make that's depending on every individual's play style. You might be a casual player who just wants to play the game and experience the world for yourself, following the story line that is on par with the television series. In that case, perhaps it is not for you. On the other hand, you might be a regular player who might want to play the game seriously, weighing every decision while comparing its pros and cons. This might be for you, because every reincarnation will give you a permanent talent point. You can assign this talent point to which ever node you think would be useful to you. Most people assign it to their fealties' house building. This would unlock that particular building, allowing you to build that even if you've sworn allegiance to another fealty. There are also players that have reincarnate more than 30 times, I would presume that their goal was to make max out every talent node for every fealty but I have yet to ask them about it, so you can't take my word for it.

Now that you've decided what kind of player you are, perhaps it is time to look at the steps you would take to reincarnate.

The following picture shows you the reincarnation quest that will appear after you've completed volume one, epilogue.


If you do not see it or have already said no, you will still be able to access the reincarnation process by going to your character tab,


character history,


 and then clicking on the "Reincarnate" button.


For now, let's assume that you've clicked on the quest.


Gammer would talk to you and you'll have three choices to choose from. The first choice would show you the following conversation.


The second choice would be the following.


And the third choice.


All but the third choice would trigger the following. The first option would trigger the reincarnation process while the second one would stop it (you can decide in the future, you can find it in your character history page).


If you choose the first option, you'll see the following.


If you choose the second option, you'll see the following.


Now that you've made your choice, we can proceed. You would see the following image when you have decided to go for it.


It is a reminder to you, about the things that you will lose and the things that you would keep after going through with it. If you change your mind, it's not too late to click "Cancel". Once you click the "Reincarnate" button, there is no turning back.

So, to reiterate, you WILL lose EVERYTHING except your gold, the stuff that you've spent gold on (items made permanent by gold, upgrades bought using gold, etc,), power and speed-ups that has the "persists through reincarnation" description.

Now that you've decided to click on that button, there will be no turning back and you'll see the following picture. Here, you are give a permanent talent point to place so that you'll have that talent permanently.


I would recommend that you select your fealty's building to unlock, as shown below. It's the same as when you normally assign those talent points. Select on the talent node you want and then click "Choose Talent". Here you can see that I chose the Stark's "Hunting Lodge" because I was a Stark at the point when I was taking the screen shot. This will allow me buy the "Hunting Lodge" when I reach level 13 on my next life.


After you've selected (Yes. You can decide which node you want. You might not want to unlock that building, you might want one of the other stuff and you may do so but I should warn you again, if you do select a different fealty, you will not be able to access this same fealty tab nor its building), the following picture will pop up and you'll have to confirm if that is the talent node that you've chosen.


At this point, if you changed your mind, click "Cancel" but if you are certain, click "Restart".


Congratulations. You have just reincarnated. Welcome to the world of Westeros, you new born thingy. The following image shows you the grayed out talent nodes of the Stark fealty (I have chosen a different fealty) and you can see a purple circle on the building node. This permanent point indicates that I will be able to buy the Stark's fealty building at level 13 even if I'm in a different fealty (Yes. I know. I have repeated this multiple times but I am fairly certain that there are people out there that needed the explanation).


There we have it. A complete step by step guide on the reincarnation progress. Thank you for reading till the end, and also for sticking it out all the way through. I know I have included some lengthy explanations but, well, I figured it's something that needs to be explained quite thoroughly.

Now that my humor has dried out and the guide is at its end, I'll stop now, hope that you have an awesome time with the game and hope that this helps you, even if it's a little.

As always, leave me a comment and let me know what you think, or just say hi!

Farewell,
Lord Severus

Saturday, 31 May 2014

Game of Thrones Ascent: Adventure Party.

Hello again,

Well, I was asked to create a step by step guide for the adventure party and seeing that it's a pretty relaxing weekend with no pesky first years barging through my office door, I've decided to do just that. I'll probably not find another good opportunity like this anytime in the near future.

So first of all, what is the adventure party? The adventure party is exactly what the words mean. A party of people sent on adventures. In this case, your sworn swords. Going on these adventures help you to level up your sworn swords and also to collect resources, depending on which adventures you're sending them to.

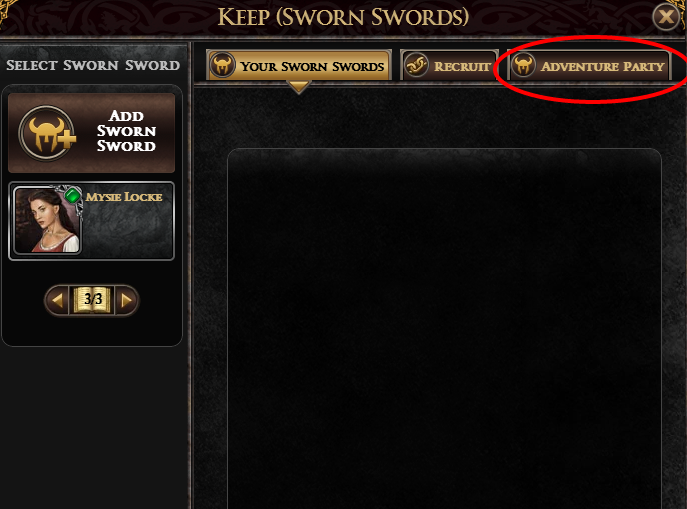
Now, the first step is to unlock that adventure party ability. Where do you find this? It's simple, really. After leveling up to level 20, you'll be able to assign a talent as usual. Go to the talent page and select the "Party" tab and you'll see the following below. Click on the top left ability, which increases your adventure party size by 6. Once you assign the talent here, you've unlocked that ability.


Next, go over to your sworn swords screen. Make sure you have available swords to send on these adventures. Click on the "Adventure Party" tab.


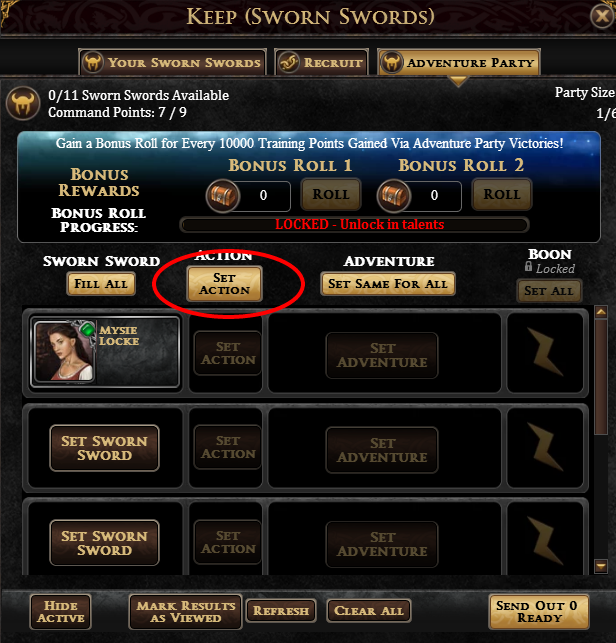
You'll see the following screen and this is where you'll be able to choose which swords to send for adventures, what actions to use and the adventures you want them to go on.
1. This will fill every slot with all your idle sworn swords.
2. This will fill the individual slot with the idle sword of your choosing.
3. This will set the same action for all the swords that have been assigned a slot. You'll need to pay with gold to unlock the option for individual actions.
4. This will set the same adventure for all the swords assigned. Same as the above, you'll need to pay with gold to unlock.
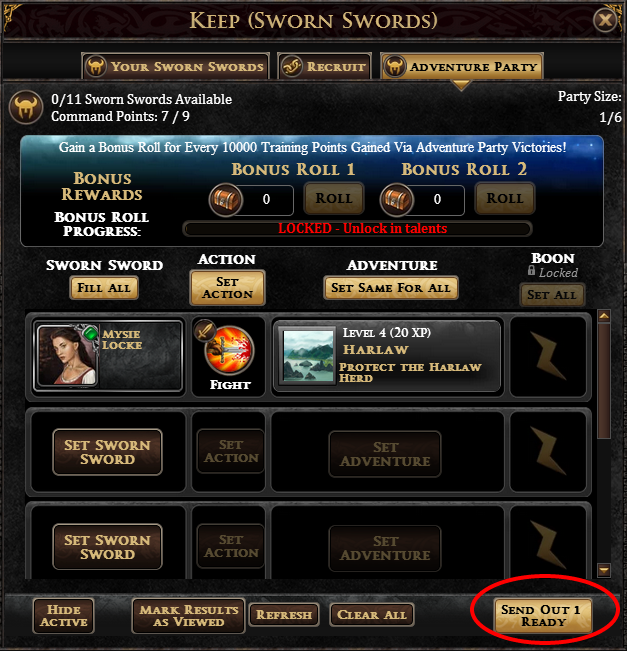
5. This will send all your swords assigned to the adventure/s chosen.


Clicking on the "Set Sworn Sword" button will bring up this window. You'll be able to choose which sword you'll want to assign. For the purposes of this guide, we'll choose Mysie Locke here. Once you've chosen, click on the "Select" button.


You'll see that she has appeared in the first slot. Next, click on the "Set Action" button to assign the action the sword will be taking.


You'll see this window popping out. Choose the action and click on the "Go" button.


Click on the "Set Same For All" button and you'll see this menu. Click on which ever adventure that you'll want to send your sword or swords to. Yes. Click on the pictures. Which ever one you want. There are plenty.


Once that is done, you'll see the slot being filled with your chosen sword, action and adventure. Now, all that is left to do is to click on the bottom right button.


The following image is what you'll see after the sword or swords come back from the adventure. What do you know? I won! You'll get to see the rewards that you've gotten, in this case, 26 silvers, 20 training points (which are basically the points needed for your sword to get to the next level/rank) and a wood resource.
1. This will show you the details of that adventure.
2. This will send out the sword or swords again.


And now, you've learnt how to use the adventure party feature. It really is a lazy person's answer to sending a whole bunch of swords at the same time with only a click of a button. Well, that's after you've assigned everything. It's also a good way to keep training your swords and getting additional resources without relying solely on your village center. Adventures also get increasingly difficult as the level increases but they yield better rewards too.

So, have fun with it, after all, you're the lord or lady of your hold.

As always, leave me a comment and let me know what you think, or just say hi!

Farewell,
Lord Severus

Wednesday, 28 May 2014

Game of Thrones Ascent, Alliance vs Alliance: Attack!

Hello again,

I've been playing this new muggle game for quite a bit and have decided to write a few guides that might help those who have trouble understanding how to play the game. I might not be doing every single aspect of the game but I guess, we'll see what other aspects might be needed and if it would affect with my wizarding duties.

So, maybe you've been playing this game for a while, maybe you've just started and perhaps you're enticed by all the clickable buttons that does stuff in the game and some of these buttons might be unfamiliar to you. Well, you've come to the right place if you're keen on attacking other camps in the alliance vs alliance phases.

First of all, what is the alliance vs alliance phase? It's basically a period of time when the alliances in the game unsheathe their swords, put on the armor and battle for fame, glory, rewards and bragging rights. Tired of words and can't wait to start attack? Alright, alright, hold your horses, I'll start right now.

To begin attacking other alliances, first click on the "Alliance" tab on the bottom of your screen as circle in the picture below.
ava1


You'll see this screen pop out with the name of your alliance, how many members you'll have, the number of members that are participating in the current alliance phase, the name of your leader, what your alliance is about and by default, you'll see your message of the day that's written by your leader. Click on the "Camps" tab to look at where your alliance has placed their camps.
ava2


You'll see the amount of camps, their levels and specialties. Do take note that you are only able to attack other alliances who have placed camps in the same area as you have. For this example, we will focus on the level two camp that's being built on the neck in the north area. You'll see the following pop out. To garrison a sworn sword, click on the "Garrison" tab.
ava3


You will be able to see this pop out. If you haven't garrison a sword, it will be empty, so click on the "Garrison" tab to select a sworn sword.
ava4


A window would pop out to show you the amount of idle sworn swords. In this case, we have Raymund Sevenstreams. If you have a few, choose the sword that you want to place into camp and click the "Select" button.
ava4a


Once your sword is garrisoned in the camp, you'll be able to attack or defend the camp. If the sword is left idling in the camp, it would automatically defend from any incoming attacks from other alliances. So it is good to balance between attack and defending your camp. Anyway, since you're here, it is obvious you want to attack, so let's get on with it. Select the "War Map" tab and you'll see the following. By default, you'll see the list for the overall ranking of alliances.
ava5


Since the camp in our example is in the north, select the tab as shown below. Each tab represents the different areas where the camps are built on.
ava6
ava7

You will see the following appear. The "Prev" button shows the alliances that have a higher ranking than you, while the "Next" button shows the alliances that are ranked lower than you. Depending on the alliance ranking, the amount of victory points that you'll earn for your own alliance, differs. Note, to extend the list, click on the "View Self" button to see your ranking and it does makes it easier to look through.
ava9


Once you have decided on an alliance, click on the "Go" button and you'll see the following pop out. Let's choose the alliance,  "The Legacy of Rhaegar" (Don't worry, I didn't attack. So there isn't a need to fret, people from that alliance). Seeing that there isn't any known camp, just choose any camp and click the "Go" button.
ava10


You'll be taken to a window that will allow you to choose the idle swords that are in the camps, "The Neck", "Torrhen's Square" or "White Knife". Remember that we garrisoned Raymund at "The Neck"? It doesn't matter if it was a different camp. As long as they are within the same area which is in "The North". Does it make sense?
Anyway, select the idle sword and choose the preferred action as you would with those quests. Once that's done, click on, you guessed it, "Go".
ava11ava12

Congratulations! You have just sent your sword attacking. I hope this guide isn't too confusing and will help you navigate through the many clickable buttons in the game. Now go out there and attack!

As always, leave me a comment and let me know what you think, or just say hi!

Farewell,
Lord Severus